
I have always been amazed by impactful AI applications that transform people’s life and one of the areas where I see this transformation happening nowadays is healthcare.
AI and healthcare is an association I haven’t really considered until very recently. So I set myself a personal challenge: learn about one medical application, implement it and share it.
At first, I was a total newbie and didn’t know anything about the field. So I started searching for applications, papers and open datasets.
In my joyful pursuit of data, I came across MRNet: a knee MRI dataset collected by Stanford ML Group with the goal of studying knee injuries. The dataset is available upon written request and is accompanied with a research paper that the team published. In a nutshell, the work proposes a neural network architecture that detects 3 types of knee injuries with a very good performance.
In this series of upcoming posts I will show you how I implemented this paper.
- In this first post (1/3), I will go through the problem we’re trying to solve and we’ll then look into the data. We’ll see that MRI scans are special data structures that require special processing
- In next post (2/3), I’ll show you how to build a convolutional neural network to classify knee injuries from MRI scans. I’ll implement it in PyTorch and I’ll provide tips and tricks for training it efficiently
- In the last post (3/3) , I’ll show you how to make neural networks interpretable by visualizing their predictions. In particular, we will discuss a method called Class Activation Map (CAM).

What you'll learn today
- You're probably as unfamiliar as me regarding knee dysfunction. So I'll do my best explaining what type of knee injuries we're going to look at
- I'll briefly introduce Magnetic Resonance Imaging and explain the type of data it produces: we'll see that deep learning has a great potential to process it for medical diagnosis automation
- We'll explore the MRNet dataset provided by Stanford
- I will show you how you can efficiently and without javascript code build interactive data exploration widgets. With Python code, only.
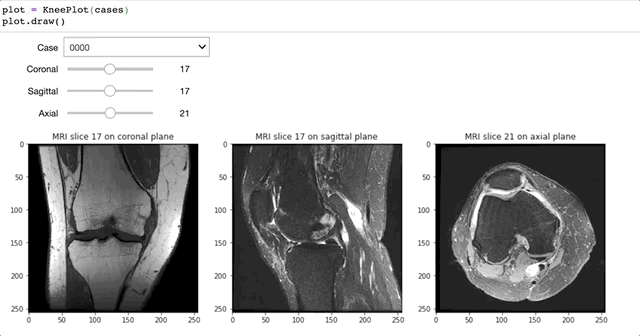
Spoiler alert, here's what it will look like
Let's start ! 😁
Anterior Cruciate Ligament (ACL) tears
In this project, we will specifically focus on Anterior Cruciate Ligament (ACL) tears which are the most common knee injuries among top athletes in soccer or basketball.
ACL tears happen when the anterior cruciate ligament is either stretched, partially torn, or completely torn. The most common injury is a complete tear.
Symptoms include pain, a popping sound during injury, instability of the knee, and joint swelling.
There are around 200,000 ACL tears each year in the United States, with over 100,000 ACL reconstruction surgeries per year.

To diagnose knee injuries we typically use Magnet Resonance Imaging.
Magnetic Resonance Imaging
Magnetic Resonance Imaging (MRI) is a medical imaging technique used in radiology to form a picture of the anathomy and the physiological processes of the body.
MRI is used to diagnose how well you responded to a treatment as well as detecting tears and structural problems such as heart attacks, brain injury, blood vessel damage, etc.
Here is an animation of a head MRI:
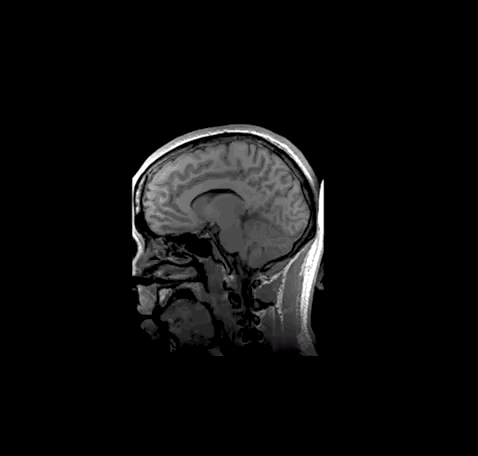
An MRI scan is not a single image of an organ. It's actually a set of different images or slices stacked together in a volume (that's why you see an animation going through every slice of the MRI).
You can think of the MRI as the process of going through the organ at different levels of depth and according a given plane.
ACL tears diagnonis and the high potential for automation
As mentioned few cells above, MRI of the knee is the preferred method for diagnosing knee injuries. However, interpretation of knee MRI is time-intensive and subject to diagnostic error and variability. An automated system for interpreting this type of image data could prioritize high risk patients and assist clinicians in making diagnoses.
Moreover, a system that produces less false positives that a radiologist is very advantageous because it eliminates the risk of performing unnecessary invasive knee surgeries.
In the next posts we will see how we can build an ACL tear classifier on MRI scans using deep learning. But let's first look at the data and understand it in this post.

MRNet dataset
MRNet is a the knee MRI dataset provided by Stanford.
It's splitted in training set (1130 cases), validation set (120 cases) and test set (120 cases) and is organized as follows:

Note that we don't have access to the test set.
Note that case refer also to patient. So we'll use these two terms interchangebly.
What files are we going to use?
train-acl.csv and valid-acl.csv (we'll ignore the other files for now) indicate the labels of each case (either normal or subject to ACL tear) on train and validation data respectively.
Each case, in both train and valid folder, has 3 MRI scans taken from different planes: sagittal, coronal and axial.
To make a proper decision regarding a case, the radiologist usually look at MRI scans from different planes in order to have a global view.

The 3 MRI scans of a given patient don't necessarily have the same number of slices.
Between different cases (or patients) and for a given plane, MRI scans don't necessarily have the same number of slices either. This is an important information to keep in mind, because it conditions the architecture of the deep learning model we'll use later for classification.
Explore the MRNet dataset with some code
Let's now look at the data and explore it.
from IPython.core.display import display,HTML
display(HTML('<style>.prompt{width: 0px; min-width: 0px; visibility: collapse}</style>'))

%matplotlib inline
%load_ext autoreload
%autoreload 2
%config Completer.use_jedi=False

import numpy as np
import pandas as pd
import matplotlib.pyplot as plt
from ipywidgets import interact, Dropdown, IntSlider
from tqdm import tqdm_notebook


train_acl = pd.read_csv('../data/train-acl.csv', header=None,
                       names=['Case', 'Abnormal'],
                       dtype={'Case': str, 'Abnormal': np.int64})

train_acl.head()
The csv files train-acl.csv and valid-acl.csv have the same structure with two colums:
- Case: the id of the case
- Abnormal: a binary value (1/0) indicate the ACL tear
print(train_acl.shape)
# (1130, 2)
ACL tears appears in less than 20% of the cases for the training set.
train_acl.Abnormal.value_counts(normalize=True)

# 0    0.815929
# 1    0.184071
# Name: Abnormal, dtype: float64
Let's look at a given case from the 3-plane perspective:
case = '0000'

mri_coronal = np.load('../data/train/coronal/0000.npy')
mri_axial = np.load('../data/train/axial/0000.npy')
mri_sagittal = np.load('../data/train/sagittal/0000.npy')

print(f'MRI scan on coronal plane: {mri_coronal.shape}')
print(f'MRI scan on axial plane: {mri_axial.shape}')
print(f'MRI scan on sagittal plane: {mri_sagittal.shape}')
Each MRI scan is a tensor of s slices. Each slice is a grayscale image of size (256, 256).
Let's visualize the first one on each plane:
fig, (ax1, ax2, ax3) = plt.subplots(1, 3, figsize=(15, 5))

ax1.imshow(mri_coronal[0, :, :], 'gray');
ax1.set_title('Case 0 | Slice 1 | Sagittal');

ax2.imshow(mri_axial[0, :, :], 'gray');
ax2.set_title('Case 0 | Slice 1 | Axial');

ax3.imshow(mri_sagittal[0, :, :], 'gray');
ax3.set_title('Case 0 | Slice 1 | Coronal');
It's not very convenient to plot slices of MRI scans and have a global view between three different planes, especially when you have a large number of slices per MRI scan and need to go over each individual slice.
SO here's how we can turn a static matplolib plot into an interactive widget that allows you to:
- select a case
- slide over the slices per plane
- see the plots dynamically change
Let's see how this can be done:
You first need to load your data in a convenient dict where the keys are case numbers and the values are dictionaries in which keys are planes and the corresponding values are numpy arrays representing the MRI scan.
train_path = '../data/train/'

def load_one_stack(case, data_path=train_path, plane='coronal'):
    fpath = '{}/{}/{}.npy'.format(data_path, plane, case)
    return np.load(fpath)

def load_stacks(case, data_path=train_path):
    x = {}
    planes = ['coronal', 'sagittal', 'axial']
    for i, plane in enumerate(planes):
        x[plane] = load_one_stack(case, plane=plane)
    return x

def load_cases(train=True, n=None):
    assert (type(n) == int) and (n < 1250)
    if train:
        case_list = pd.read_csv('../data/train-acl.csv', names=['case', 'label'], header=None,
                               dtype={'case': str, 'label': np.int64})['case'].tolist()
    else:
        case_list = pd.read_csv('../data/valid-acl.csv', names=['case', 'label'], header=None,
                               dtype={'case': str, 'label': np.int64})['case'].tolist()
    cases = {}

    if n is not None:
        case_list = case_list[:n]

    for case in tqdm_notebook(case_list, leave=False):
        x = load_stacks(case)
        cases[case] = x
    return cases

cases = load_cases(n=100)
After loading 100 cases, let's look a the case 0000
print(cases['0000'].keys())

#dict_keys(['coronal', 'sagittal', 'axial'])
As expected, it contains a nested dict that maps plane to numpy array objects.
Let's check this:
print(cases['0000']['axial'].shape)
print(cases['0000']['coronal'].shape)
print(cases['0000']['sagittal'].shape)

# (44, 256, 256)
# (36, 256, 256)
# (36, 256, 256)
Now we define a class called KneePlot that creates the interactive plot from the cases object.
This class defines:
- an abstract method plotslices that plots three slices of a given case. This method is automatically called each time an interaction is done on the widgets
- a draw method responsible of defining the dropdown and slider widgets that fetch the user input data and pass them to the plotslices interactivley.
class KneePlot():
    def __init__(self, cases, figsize=(15, 5)):
        self.cases = cases

        self.planes = {case: ['coronal', 'sagittal', 'axial'] for case in self.cases}

        self.slice_nums = {}
        for case in self.cases:
            self.slice_nums[case] = {}
            for plane in ['coronal', 'sagittal', 'axial']:
                self.slice_nums[case][plane] = self.cases[case][plane].shape[0]

        self.figsize = figsize

    def _plot_slices(self, case, im_slice_coronal, im_slice_sagittal, im_slice_axial):
        fig, (ax1, ax2, ax3) = plt.subplots(1, 3, figsize=self.figsize)

        ax1.imshow(self.cases[case]['coronal'][im_slice_coronal, :, :], 'gray')
        ax1.set_title(f'MRI slice {im_slice_coronal} on coronal plane')

        ax2.imshow(self.cases[case]['sagittal'][im_slice_sagittal, :, :], 'gray')
        ax2.set_title(f'MRI slice {im_slice_sagittal} on sagittal plane')

        ax3.imshow(self.cases[case]['axial'][im_slice_axial, :, :], 'gray')
        ax3.set_title(f'MRI slice {im_slice_axial} on axial plane')

        plt.show()

    def draw(self):
        case_widget = Dropdown(options=list(self.cases.keys()),
                               description='Case'

                              )
        case_init = list(self.cases.keys())[0]


        slice_init_coronal = self.slice_nums[case_init]['coronal'] - 1
        slices_widget_coronal = IntSlider(min=0,
                                          max=slice_init_coronal,
                                          value=slice_init_coronal // 2,
                                          description='Coronal')

        slice_init_sagittal = self.slice_nums[case_init]['sagittal'] - 1
        slices_widget_sagittal = IntSlider(min=0,
                                           max=slice_init_sagittal,
                                           value=slice_init_sagittal // 2,
                                           description='Sagittal'
                                          )

        slice_init_axial = self.slice_nums[case_init]['axial'] - 1
        slices_widget_axial = IntSlider(min=0,
                                        max=slice_init_axial,
                                        value=slice_init_axial // 2,
                                        description='Axial'
                                       )

        def update_slices_widget(*args):
            slices_widget_coronal.max = self.slice_nums[case_widget.value]['coronal'] - 1
            slices_widget_coronal.value = slices_widget_coronal.max // 2

            slices_widget_sagittal.max = self.slice_nums[case_widget.value]['sagittal'] - 1
            slices_widget_sagittal.value = slices_widget_sagittal.max // 2

            slices_widget_axial.max = self.slice_nums[case_widget.value]['axial'] - 1
            slices_widget_axial.value = slices_widget_axial.max // 2


        case_widget.observe(update_slices_widget, 'value')
        interact(self._plot_slices,
                 case=case_widget,
                 im_slice_coronal=slices_widget_coronal,
                 im_slice_sagittal=slices_widget_sagittal,
                 im_slice_axial=slices_widget_axial
                )

    def resize(self, figsize):
        self.figsize = figsize
Few consideration about the data:
- The slices are significantly different from a plane to another: this is the first thing I noticed as a non-specialist
- Within a given plane, the slices may substantially differ as well. In fact, and we'll see it later, some slices can better highlight an ACL tear
- In the next post, we'll build an MRI tear classification per plane. We'll see next that the combination of these three models outperforms individual models
- A MRI scan with respect to a given plane can be considered as a volume of stacked slices. As we previously said that cases don't necessary share the same of slices, MRIs cannot then be put in batches. We'll see how to handle this efficiently.
Next: building an ACL tear classification model
In the next post, we'll build a convolutional neural network that will ingest MRI scans and predict the ACL tear probability.
We'll discuss the architecture of this network as well as the different components that handle the data processing, data augmentation and transfer learning.
We'll see how to put everything together using PyTorch. Move to the next post for more details.